TABLE OF CONTENTS
- MultiBook tool
- Creating a reservation from the bookings calendar
- Create a reservation for a virtual package
- Out of order (OOO) -bookings - Blocking a room from sales
- Move bookings
- Editing a booking
- Booking change log
- Canceling a booking
MultiBook tool
MultiBook is a powerful tool developed by Moder to streamline the management of reservations and group bookings. With MultiBook, you can search for available rooms from the back office, create new reservations, and manage them seamlessly in one place. This tool is perfect for handling both individual and group bookings, offering a clear and fast way to manage the booking process.
How does MultiBook work?
MultiBook operates on a shopping cart principle, making reservation management intuitive and straightforward:
Add items to the cart
Start by selecting the rooms or products you want to add to the cart. This can include accommodation or activities.Include activities and additional services
Add desired activities and extras, such as breakfasts, massages, or other services, to make the booking a complete package.Enter the booker’s details
Finally, input the booker's details and any other necessary reservation information. You can modify and refine the booking as needed before saving it.

Using MultiBook for individual reservations
Managing individual bookings with MultiBook provides a clear, shopping cart-based process for creating reservations. However, keep in mind that group bookings involve a few additional features, which are covered in detail in the Group Booking course.
The core functionality of MultiBook remains the same for group bookings, but the "magic buttons" designed for managing larger groups make handling complex reservations faster and more efficient. In this course, you'll learn everything you need to know about using MultiBook for individual reservations, so you'll be well-prepared to dive into group bookings when you're ready!
Search availability and select products
Open MultiBook
To begin using the MultiBook tool, open it from the Moder main menu. MultiBook is easily accessible through two different options, both of which take you directly to the MultiBook view, where you can start creating and managing new reservations.
How to open MultiBook
- From the left-hand menu: Click the "MultiBook" button in the left-hand menu of Moder. This will take you directly to the MultiBook view.
- From the top-right corner: Click the "MultiBook" button in the top-right corner of Moder. This will also open the MultiBook view.
Once MultiBook is open, you can easily select your desired product packages, add activities and additional services, and input the booker's details quickly and effortlessly.

Search availability
Once the MultiBook view is open, start by searching for availability as follows:
- Select reservation details
- Start date: Choose the start date for the reservation.
- Duration: Specify the length of the reservation.
- Number of guests: Enter the number of people for the reservation.
- Use filters if needed
- property filter
- product filter (you can select multiple products at once, too)
- free text search filter
- Check availability
- The calendar below MultiBook will update based on your search criteria and display the room types available for your selected dates and guest count.
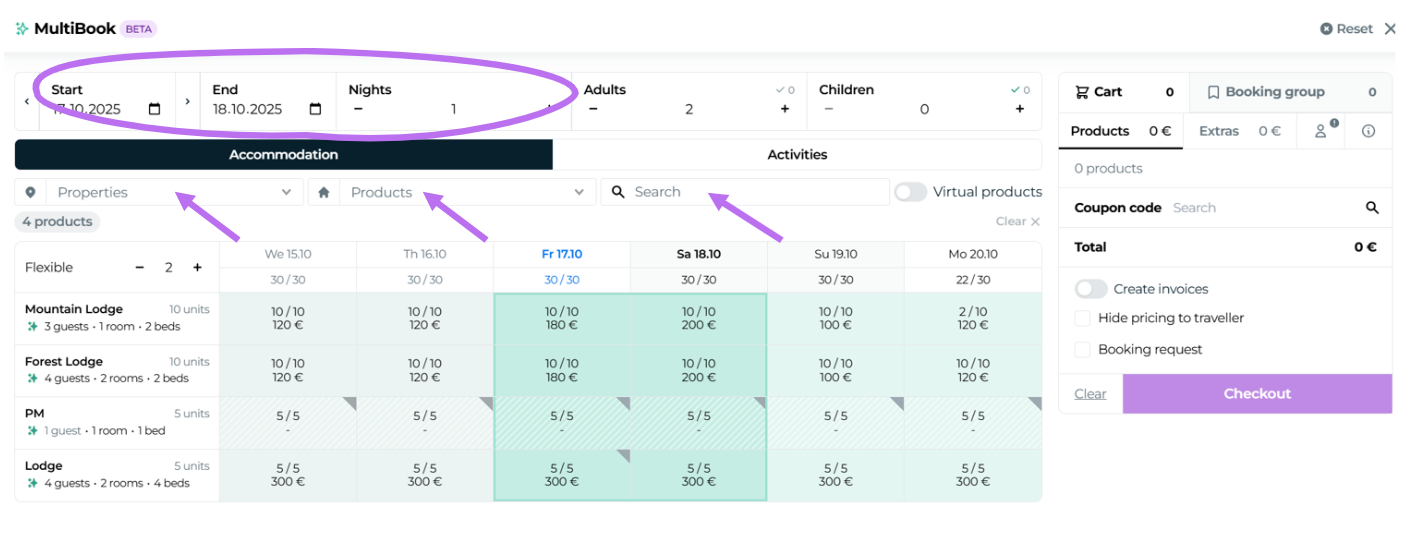
Searching for availability and selecting products is simple and efficient with MultiBook.
Once availability has been found, select the appropriate room types or activities for the reservation and add them to the cart.
Select accommodation products and activities for the reservation
Two ways to add accommodation products to the cart
In MultiBook, accommodation products can be added to the cart in two different ways, offering a smooth and flexible reservation process. You can either use MultiBook’s automatic selection feature or customize the booking manually by selecting products directly from the calendar.
Here's how
A) Using the Autofill button (green star)
- Click the Autofill button (green star), and MultiBook will automatically select the correct number of rooms for the group and add them to the cart.
- This option provides a quick way to add the required accommodations with just one click.
B) Manual selection from the calendar
- Select dates directly in the calendar by clicking the desired time slots.
- Use the bottom panel to specify the number of guests and units.
- Adjust the price if needed.
- Add the selected products to the cart by clicking "Add to Cart".
Moder tip! You can skip the search entirely by directly selecting the start and end dates from the booking calendar. Add the products to the cart right away for an even faster process!

Select activities for the reservation
Moder supports hourly-based travel products such as activities, tickets, equipment rentals, and venue rentals. Adding these products to the cart follows the same principle as adding accommodation products.
Note! For more details on activities, check out the course "Creating, managing, and operating activity bookings." It's a great resource if your accommodation business offers activities as part of its product range or if you're involved in their operations!
Here's how
Go to the Activities tab in MultiBook, where all hourly-based products are listed. From here, the process is similar to adding accommodation products.
A) Using the Autofill button (green star)
- Click the Autofill button (green star), and MultiBook will automatically select the appropriate number of hourly-based products for the first available session and add them to the cart.
B) Manual selection from the calendar
- Select a date from the calendar by clicking the desired time slot.
- Use the bottom panel to specify the number of guests and units.
- Adjust the price if needed.
- Add the selected products to the cart by clicking "Add to Cart."

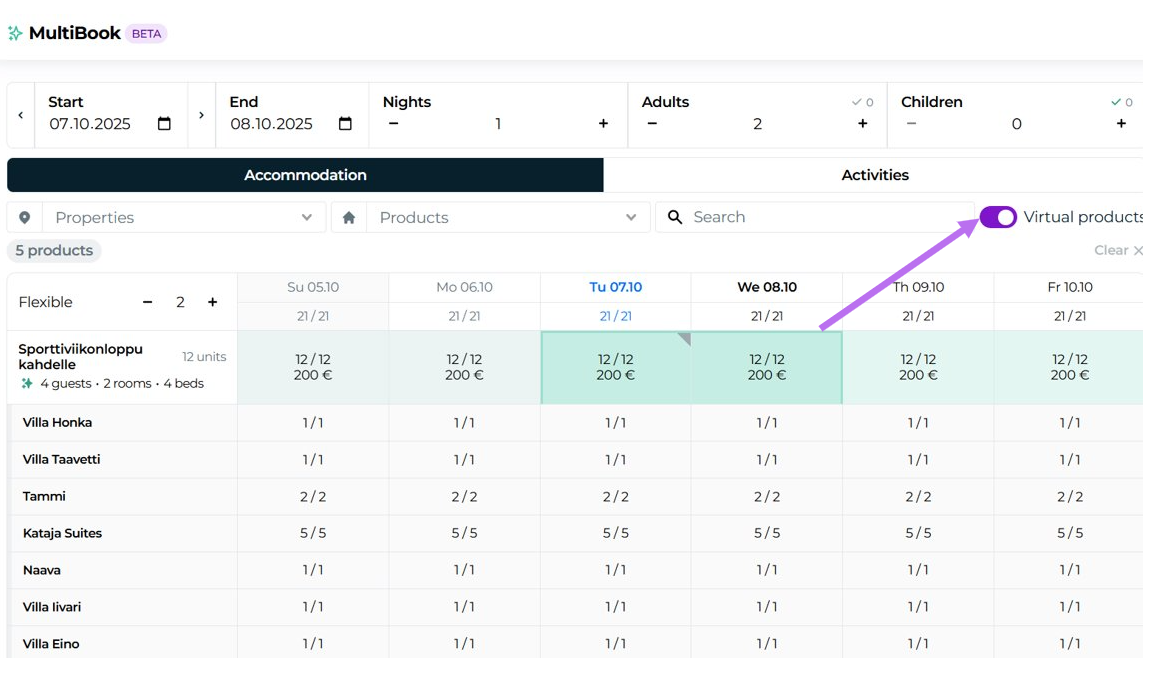
Add virtual products
You can also book virtual products in MultiBook. Simply toggle on the “Virtual products” switch to view them — and make bookings just like with any other product.
Editing products in the cart
After adding products to the cart in MultiBook, you can flexibly edit them to suit your needs before finalizing the reservation. This step allows you to fine-tune the booking details and ensure all products and prices are accurate.
Here's how
Adjust product quantities
Easily increase or decrease the quantity of any product, whether it's a room, villa, activity, ticket, venue, or other travel product. This enables quick adjustments to align with the needs of the group or customer.
Edit prices
If the price needs to be adjusted for a discount, special offer, or agreed-upon rate, you can modify it directly in the cart. The pricing flexibility ensures accurate and customized pricing for every booking.
Remove products
If a product is no longer needed, you can remove it from the cart with a single click. This gives you complete control over the reservation's contents and ensures only the required products are included in the booking.

Selecting extra services for the reservation
Adding extra services to a reservation in MultiBook allows you to offer customers a complete experience alongside their accommodation or activities. Extra services can include options like breakfast, massages, equipment rentals, or other products that enhance the customer's booking. Here's how to add and edit extra services for a reservation:
Here's how
Switch to the Extras tab
Navigate to the Extras tab at the top of MultiBook shopping cart. This view displays all the available extra services you can add to the reservation.
Choose extra services under each product
Select the desired extra services from the dropdown menu under each product.
You can choose extra services individually for each product, allowing you to tailor the services to match the specific needs of each reservation.

Moder tip! You can use the convenient copy button to copy the selected extra services to all similar products with a single click. This speeds up the process, especially when the same extra services need to be added to multiple products.

Adjust quantity and price
You can edit the quantity and price of extra services directly after selection. This flexibility ensures the booking aligns with the customer’s preferences and budget.

Fill in the customer's contact details
Adding the customer's contact details is a crucial step in finalizing the reservation in MultiBook. Accurate contact information helps keep the customer database up-to-date and ensures smooth communication related to the booking. You can easily fill in these details in the Contact Details tab in MultiBook, whether for a new or returning customer.
Here's how
Navigate to the Contact Details tab.
For new customers
Manually enter the customer's contact details by completing all required fields. The more comprehensive the information, the better your customer database will serve future needs.
Minimum details to include:
- Name
- Phone number
- Email address

For returning customers
If the customer is returning, you can use the "Search Contact Details" feature. By typing five characters of the customer’s name, phone number, or email address, MultiBook will search the customer database for matching entries. The search results will display relevant information, allowing you to quickly select and apply the customer's details.

Reservation notes and their use
Reservation notes help keep track of special requests and internal instructions, enhancing customer service and streamlining internal communication. In MultiBook, two types of notes can be added to a reservation, serving both the customer and the accommodation staff.
Types of notes
1. Additional information
- Use the Additional information field to record the customer's specific requests, such as allergy information, extra pillows, late check-in times, or other service-related details.
- These notes are visible to the customer, for example, in GuestApp and on the booking confirmation.
2. Internal notes
- Internal notes are for your company’s use only and are not visible to the customer.
- They can include details such as special room maintenance requests, payment terms, or other staff-relevant information.
- These notes help maintain clear and accessible internal communication.

Applying a discount code
Discount codes, or coupons, allow you to offer special rates or discounts directly in MultiBook. They're especially useful for applying promotions, discounts, or other price adjustments to a reservation quickly and easily. A discount code can be added before finalizing the reservation, and it directly affects the products in the cart.
How to use a discount code in MultiBook
Enter the discount code before confirming the reservation
MultiBook applies the discount code to the products in the cart when the following conditions are met:
Code validity: The discount code must be valid for the selected booking period.
Product applicability: The discount code must apply to the products in the cart, such as rooms, activities, or extra services.
See the updated price in the cart
- Once the discount code is applied, the new price is displayed directly in the cart.
- This allows you to immediately see the discounted price and confirm that the code works correctly.

Choose an invoicing method
Before clicking the Checkout button in MultiBook, it is important to select an appropriate invoicing method for the reservation and ensure how you want to handle the pricing and confirmations. MultiBook provides flexible options for invoicing and reservation management, allowing you to choose the option that best suits your needs.
Selections before clicking the Checkout button
Should an invoice be created directly for the reservation?
You can choose whether you would like to create an invoice for the booking right away in MultiBook. MultiBook generates a single invoice for the reservation, including all product items (rooms, activities, additional services). This invoice is easily accessible via the main reservation and can be sent to the customer either as a payment link or in PDF format. Sending the invoice must be done manually.
How to proceed
Activate the "Create invoices" toggle to generate a single invoice for the reservation, including all selected products.

Do you want separate invoices for each room or activity?
If you want to create separate invoices for each accommodation unit or activity, select "Split invoices." This option is useful in situations where a reservation includes multiple rooms or activities, and the customers prefer to pay individually.
How to proceed
- Activate the "Create invoices" toggle to generate a single invoice for the entire reservation, including all selected products.
- Select "Split invoices" to have MultiBook split the reservation items into individual invoices. This is ideal for scenarios where each customer pays for their own room, for example.

Should the price be hidden from GuestApp and the booking confirmation?
You can choose to hide price details from GuestApp and the booking confirmation. This is particularly useful in quote or group booking situations where you prefer not to disclose prices to the end customer.
Hiding prices can also be beneficial in cases of preliminary bookings where changes are still expected, or when the booking is made for a travel agent and invoicing is not yet required.

Booking request/preliminary booking
A booking request is an unconfirmed reservation highlighted in orange in Moder. It allows you to reserve products temporarily, wait for confirmation, or make adjustments before finalizing. You can send a booking request confirmation to the customer, indicating that their request has been received.
A booking request is a preliminary reservation that remains unconfirmed. It is marked with an orange highlight and can be confirmed later in the reservation edit view. A dedicated confirmation message can be sent to the customer as a sign that the request has been acknowledged.

Finalizing the reservation
Now we’ve reached the final step of making a reservation with MultiBook: the finalization. Finalizing a reservation essentially means clicking the Checkout button. This saves the reservation and makes it visible in the booking calendar and the reservation list.

After pressing the Checkout button, you will remain in the reservation creation view, allowing you to immediately add new reservations if needed. A message will appear at the top of your cart saying, "You are adding bookings to a group." By clicking this link, you can view the details of the previous reservation.
If you wish to create a completely new reservation in MultiBook, click the "Reset" button in the top corner. This will remove the previous reservation from the MultiBook tool. However, the reservation you just created will remain saved in your Moder system, and you can review it, for example, in the Booking Calendar.
If you wish to exit MultiBook after check-out, click on the little X on the right top corner.

Video: Learning Lounge Live MultiBook
Creating a reservation from the bookings calendar
This guide explains how to make a new reservation by clicking directly on the booking calendar and is intended only for booking a single room. From the booking calendar view, you can quickly create a new reservation for the correct room type and dates.
Start a reservation from the booking calendar
Open the booking calendar and click the date under the correct room type when the customer is arriving. Moder will open a new reservation form, where you can select the check-in date for the booking.

Select the check-out date
The date you just clicked is already set as the check-in date.
Next, select the check-out date for the reservation. This will define the duration of the booking and allow you to fill in the remaining required details.
Moder tip! If you clicked the wrong date initially, you can change the check-in date by clicking the selected date again. This will reset the selection, and you can choose the correct check-in date.
You can adjust the year and/or month, as well as the room type, using the options above the calendar.

Once the dates are selected, more options will appear in the modal.
Define the number of guests and price
Enter the number of guests staying in the room, specifying adults and children.
Moder will automatically calculate the total price, including any additional guest fees if they are defined in the pricing rules.
If a special price or discount has been agreed upon for the reservation, you can adjust the price by entering the agreed amount in the "Set new price" field. For example, if the standard price is €500 but a total price of €350 has been agreed with the guest, you can manually update the price.
If a different check-in or check-out time has been agreed upon, you can also update this information directly in the reservation. This ensures the relevant teams, such as Front Desk, housekeeping, and maintenance, have the correct details.

Enter the guest's contact details
Provide the guest's information (e.g., name, phone number, email). While the reservation system does not require all fields to be filled when manually creating a reservation, customers must complete all required fields when booking through the webshop.
Moder tip! If the guest has been a customer before, their information is saved in Moder. You can search for their details by typing at least 5 characters of their name. Moder will then display the matching customer details, which you can easily add to the reservation.

Our notes
The "Our notes" section is intended for internal notes that are not visible to the customer. This is useful for recording observations or information relevant to the staff regarding the reservation.
Language selection
Choose the language for the reservation. This setting determines the language of automatic messages or booking confirmations sent to the customer, provided they are available in multiple language versions.
Company field
Use the "Company" field to enter the company name or a reference for the invoice. These details will appear on the invoice.
Additional information
Use this field to record the guest's requests or agreed additional services (e.g., extra pillows). Information entered here will be visible to the guest in the booking confirmation and GuestApp.

Adding extra services
The reservation automatically includes services associated with the selected room type.
You can also add paid additional services available for that room type. The total price will update automatically as you add paid services to the reservation.

Save the reservation
Once all the details have been entered, click the "Save" button in the bottom-left corner. The reservation will be saved in the booking calendar and the reservation list, ready to be managed and processed.
Create a reservation for a virtual package
Booking a virtual package follows the same steps as creating a reservation in the booking calendar. The only difference is that after selecting the room category, you need to choose the desired virtual package type from the "Virtual room type" drop down menu.

When creating a reservation manually, you can select any virtual package for the booking. The system does not filter to show only virtual packages with active pricing. Be careful when selecting the virtual package to ensure accuracy.
In the webshop, your customer will only see virtual packages with active pricing and those marked as active virtual packages (accommodation packages).
Out of order (OOO) -bookings - Blocking a room from sales
Out of order booking is a convenient way to block a specific room or property from being available for use or sale during a certain period.
This booking type may be necessary for tasks like room maintenance, renovations, or other upkeep activities. An Out of order booking prevents the room from being booked by guests and helps you manage the occupancy rate of your property effectively.
Using Out of order bookings is an efficient method to manage your property's availability and ensure that maintenance and upkeep tasks run smoothly without the risk of the room accidentally being sold to a guest.
Start the booking as usual
You can create an Out of order booking in the same way as a regular booking directly from the booking calendar. Select the dates during which the room should be taken out of use.
Select the Out of order setting
Once you’ve selected the check-in and check-out dates, check the box for Out of Order / Not in use. This changes the booking to Out of order status, and no guest details will be required for the booking.

Add a reason for taking the room out of use (optional)
You can include a reason for why the room is out of use. This helps maintain clarity about the room’s status and the reasons behind its unavailability.

Save the booking
Once all necessary details have been entered, click "Save."
The Out of Order booking will be saved in the booking calendar and will be clearly marked.
View of Out of order bookings
Out of order bookings will appear prominently in your booking calendar, making it easy to see which rooms or properties are unavailable during specific periods. This visual representation helps keep your room listing organized and easy to manage.

Move bookings
The move bookings feature is a convenient way to transfer bookings from one room or location to another using the new calendar view. This functionality simplifies booking management, especially when rooms or locations need to be changed due to maintenance requirements or reorganization of bookings.
The move bookings feature is an excellent tool for daily booking management, helping to optimize the use of accommodations and streamline booking situations. However, remember to use this feature carefully to ensure the calendar remains secure.
The following guide explains how to enable the move bookings feature and transfer bookings correctly.
Activate the move bookings feature
Enable the move bookings feature using the toggle button at the top of the booking calendar. This allows you to move bookings within the calendar.
Moder tip! When the move bookings feature is active, the edges of the booking calendar will glow purple to remind you to be extra cautious. Make sure to turn off the feature as soon as you no longer need it.

Select the booking to move
Click on the booking you want to move. The booking will be highlighted to indicate your selection.
Choose a new room and date
Hover over the room and date where you want to move the booking. At this point, the booking will still appear in its original location, and a blue-bordered version of the booking will follow your mouse in the calendar.
When you’re in the correct spot, click again.
Confirm the move
The system will ask for confirmation to move the booking to the selected room or date. Ensure the details are correct and press "Yes" to confirm the move. If you decide not to proceed, click "Cancel."
Huomio! Dates for bookings originating from external channels (such as Airbnb or Booking.com) cannot be changed using this feature.
Disable the move bookings feature
After completing all the moves, remember to turn off the move bookings feature using the toggle button. This prevents accidental moves in the future.
Important considerations
- Enhanced booking management: The move bookings feature simplifies booking management and allows flexible transfers between rooms and locations.
- Restrictions on external bookings: Keep in mind that the dates of an external booking (booking that has come from Booking.com or Airbnb, for example) cannot be changed using this feature
- Use with caution! Always disable the feature once you’ve completed the moves to ensure the calendar remains secure and well-organized.
Editing a booking
In Moder, you can easily edit booking details — whether it's changing the length of the stay, adjusting the number of guests, or updating additional information.
Booking modifications in Moder are quick and flexible, but it’s important to ensure that changes are saved correctly and that any price adjustments are updated manually, especially when modifying the booking dates or duration. This helps keep bookings accurate and aligned with the customer's needs.

How to Edit a Booking
- Via the booking calendar: Click the booking preview and select Edit.
- Via the booking list: Search for the booking using the guest’s name, booking number, or another filter, and click the guest’s name to access the booking. Then, click Edit.
- Other Access Points: You can also access the booking preview from other views such as Group Bookings, Activities, Bookings, or the Cleaning List.
The editing view has two tabs: Booking and Products.

Booking Tab
In the Booking tab, you can edit the basic details of a reservation:
- Guest information
- Booking dates
- Product (room type) and the assigned unit (room)
- Check-in time
- Number of guests
- Additional booking notes
Editing Guest Information
You can update guest details by expanding the Guest Information row.

Moder Tip! Moder uses the email address to collect and store customer data. If no email is entered in the booking, the guest’s information will not be saved to the customer registry.
Fetching Customer Data from the Registry. Use the "Search customers" field to pull up returning customer details.
Editing Data. You can freely edit the fields. Changes can also be made only for this individual booking. Moder will indicate if the booking’s customer details differ from those in the registry.
Editing Dates
To change arrival or departure dates, click the "Date" row inside the booking to open an expanded view.

You can modify Start date, Booking duration or End date.
Changing the start date shifts the booking without altering its length. Changing the end date will extend or shorten the stay.
Automatic Price Update. If you adjust the booking duration or dates, Moder automatically checks if the price should change based on your pricing rules. You’ll be notified if a price update is recommended.

Upon saving the booking, Moder will ask if you want to update the price according to the price list.
Special Cases: Price Changes
- When adding nights: You must update the price to assign a value to the new nights. You can later manually change the total price to your preferred amount.
- When moving the booking to dates with different pricing: Moder will suggest a new total, but you’re not required to accept it.
Changing the Total Price of the Main Product
You can adjust the total price of the main product (e.g., accommodation, sauna, rental space, or activity) directly in the Booking tab. Note: this does not include additional services.
To update the total price:
Expand the Total Price section and Edit the main product price by entering the desired amount. For example: Accommodation = €195. If the booking includes multiple nights, Moder will divide the manually set total evenly across all nights.

Products Tab
- Daily Grouping: View all booking items grouped by individual days.
- Edit Prices by Day: Modify the accommodation price for each night of the stay separately.
- Add Additional Services: You can add extra services to the booking, including those included in the price of accommodation or other main products.
- Edit Additional Services: Set the price, date, time, and notes for each added service.

Editing the Main Product (e.g. accommodation or activity)
Expand any date to see which products have been booked for that day. Click on a product row to open the editing view for that specific product.
Example below: Editing the one-night price for Mountain Suites on May 16, 2025.

Adding Extra Services
At the top of the window, select the “Optional / Included Services” tab and search by product name.
Once added, the service will appear in purple in the Products view. If the service is set to be applied on the check-in day, it will be added to that specific date.
Example below: Late Check-out is configured to always appear on the departure day.

Editing an Extra Service
In the Products view, you can:
- Assign the service to specific days
- Adjust the price
- Set the time
- Add custom notes
Champagne in the Room example: Champagne has been added to the booking and is to be delivered on the second night at 13:00.

Removing Extra Services
Click the service for the selected day and remove it. After saving, the service will be deleted from the booking.
Special Cases
If the booking includes multiple services for each day (e.g. breakfast, late check-out, final cleaning) and the booking is shortened, you’ll need to either move or delete the orphaned* services.
* An orphaned additional service is one that no longer has an associated main product after the modification.
Booking change log
The booking change history log is a valuable tool that clearly displays all changes made to a booking, along with information on who made the changes and when. This helps track the editing process and ensures that all modifications are manageable and traceable. The change history provides day-by-day details and precise information about the edited data.
Change history is essential for booking management, allowing you to easily review and monitor changes. This ensures that all booking details stay up-to-date and that the editing process is well-documented.
How to open the change log
- Navigate to the desired booking and open its preview window.
- Click the "Updated xx.xx.xxxx" section at the top of the booking details. This will open the booking's change history.

The change history displays all modifications in chronological order, including the person who made the changes and the details of the edits.
Details in the change log
Username:
Shows the user account that made the change. This helps identify who edited the booking.Edited data name:
Displays which information was modified, such as arrival and departure dates, prices, or additional details.Change markers:
- Red: Deleted data. This highlights information that was removed from the booking.
- Green: Added data. This indicates new information added to the booking.
Canceling a booking
Canceling a booking in Moder is quick and easy, whether it’s due to changes in the customer’s plans or the need to free up the room for other purposes.
After cancellation, the booking is removed from the booking calendar but can still be viewed in the booking list if needed. This allows you to track canceled bookings and retrieve them later, for example, in customer service situations.
This guide explains how to cancel a booking and how to view canceled bookings afterward.
Steps to follow
Open the booking preview
Navigate to the desired booking either from the booking calendar or the booking list (see instructions in "Editing a booking").
Cancel the booking
Click the "Cancel booking" button located at the left bottom corner of the booking preview.
Confirm the cancellation
The system will ask if you’re sure you want to cancel (delete) the booking. Click "Yes" to confirm, and the booking will be canceled and removed from the booking calendar.

Viewing canceled bookings
Filtering in the booking list
Canceled bookings can be found in the booking list. To search for canceled bookings, go to the booking list and use the filters in the top bar, selecting either "Include canceled" or "Only canceled". You can also use filters like the traveler’s name or booking number to refine your search.
This feature makes it easy to track canceled bookings and retrieve them later when needed, such as in customer service situations.

Credit note and refund
Credit notes are needed when a payment needs to be refunded to the customer, either fully or partially, such as in the case of a cancellation. In Moder, creating a credit note is simple and can be done based on the original invoice. However, it’s important to note that the actual refund must be processed directly through the payment service provider (Stripe), or via a bank transfer.
Was this article helpful?
That’s Great!
Thank you for your feedback
Sorry! We couldn't be helpful
Thank you for your feedback
Feedback sent
We appreciate your effort and will try to fix the article