Experience Designer - packaging tool
Last updated: September 23, 2026
Experience Designer is Moder’s packaging tool that makes it easy to create even more complex packages. With this tool, you can combine accommodation, activity, and extra service products into one clear package that’s easy to sell and manage.
The Experience Designer tool is available to Moder customers starting from the M package.
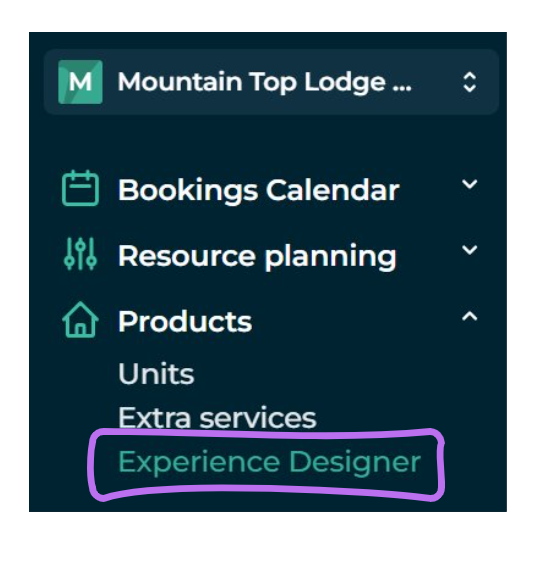
The tool can be found under the Products menu:
Creating a package using Experience Designer
Adding products and pricing
Before moving on to Experience Designer, make sure that all parts of the package have been created and priced in Moder. This includes activity products, accommodation products, and extra services that make up the package.
For pricing, you can take advantage of internal prices for activity and accommodation products, which Experience Designer uses to calculate the total package price.
You can read more about adding internal prices in this product release:
📄 12.8.2025 Pricing 2.0 - price groups
Note about extra services: extra services do not follow products into Experience Designer in the same way as with normal bookings (even if the additional service is included in the price). This is intentional, since the additional services for packages often differ from those of regular products. Therefore, they are always added separately for packages.
In some cases, it may even be better to create entirely separate additional services specifically for packages, intended to be used only with packages.
Creating a Package
Once all package products have been added and priced, we can move on to Experience Designer itself. Experience Designer can be found in Moder under the Products menu.
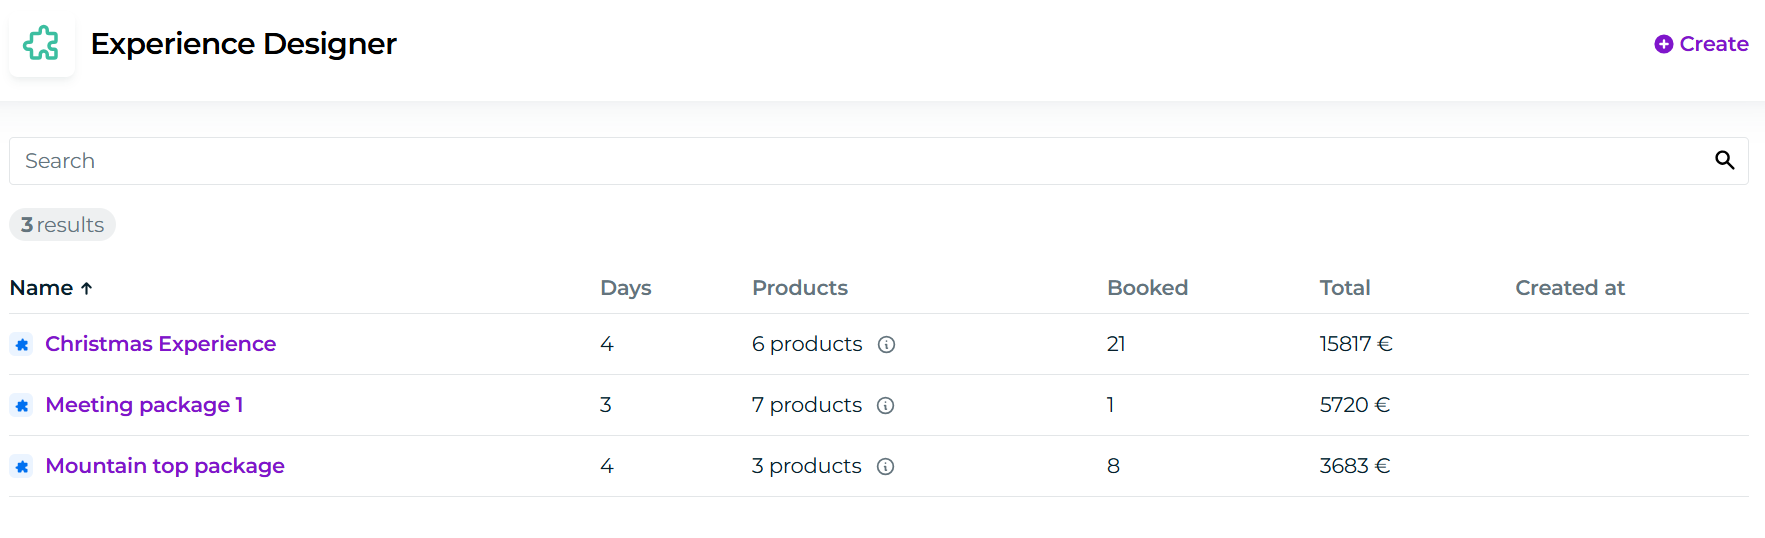
Next, let’s create an example package called “Best of Winter Experience.” The package duration is four days and three nights.
The package includes the following services/products:
accommodation for three nights
breakfast (on intermediate days and departure day)
lunch (on intermediate days)
dinner (on arrival day and intermediate days)
husky safari
reindeer safari
Finnish sauna experience
visit to Santa Claus
Creating the package with Experience Designer:
Click “Create” in the top-right corner. Give the package a name and, if you like, add a short description. Then click “Create”
After this, you can optionally add one or more images to the package → click the package name → Edit → upload or drag and drop the images you want.
Please note that at this stage, packages created with Experience Designer are for internal use only and cannot yet be added to webshop sales.
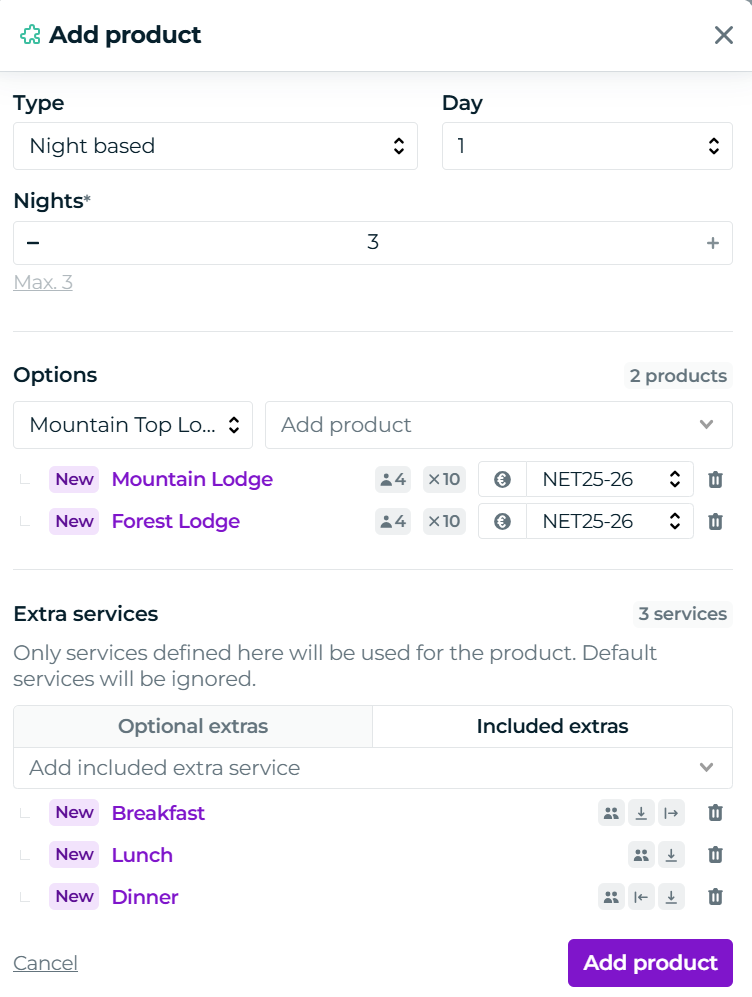
Start by adding an accommodation product to the package. Click "Add product" on the first day.
Fill in the details as follows:
Type: select Night-based
Day: if the package includes overnight stays in different accommodations (e.g. first night in a hotel, second night in a cabin), select which night’s accommodation product you are adding
If guests stay in the same accommodation for all nights, you can simply set the maximum number of nights by clicking "Max xx", as shown in the example below
Options: select all accommodation products that the package is available for
Price group: if the package pricing does not use standard webshop prices and you have created internal prices for the package, select the price group that should be primarily used for the accommodation product
In the example below, an internal price group called NET25-26 is used
If you do not use internal prices, you can leave this set to None
Extra services: finally, select all extra services that are included in the price and should be added to the accommodation product
In the example below, these are breakfast, lunch , and dinner
Finish by clicking "Add product".
Next, add the activity products to the package, along with any extra services that may be included. Click the "Add product" button on the day to which you want to add the activity.
It is good to note that once bookings are made for the package, activities can be moved flexibly within the package from one day to another. This means that an activity product does not need to be added separately for each day of the package, even when the package content is customised per customer based on activity availability.
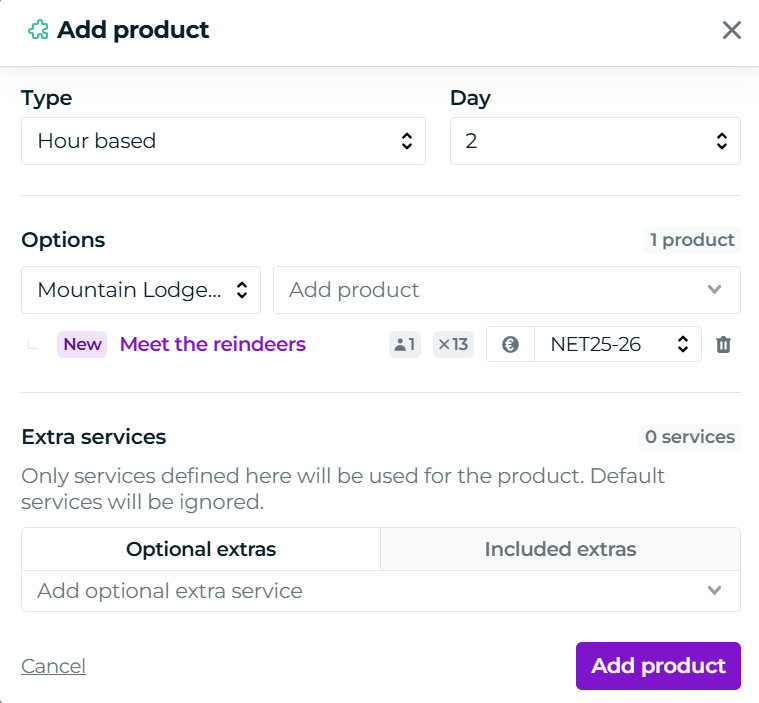
Type: select Hour-based
Day: select the day on which the activity will be added
Options: add the desired activity product
Price group: if the package pricing does not use standard webshop prices and you have created internal prices for the package, select the price group that will be primarily used for the activity product in the package
In the example below, the internal price group NET25-26 is used for all other activities, except for the husky safari and sauna experience, which use standard webshop prices
If you do not use internal prices, you can leave this set to None
Extra services: add any extra services included in the activity product as needed
Finally, click Add product.
When all products have been added to the package template, you have successfully created your first package with Moder's Experience Designer!
Creating package bookings with Experience Designer
Booking a package in Experience Designer is easy and flexible. In the booking window, you can adjust product dates effortlessly by dragging, book multiple packages at once, and optionally create a group booking directly from the package bookings.
Creating a booking with Experience Designer
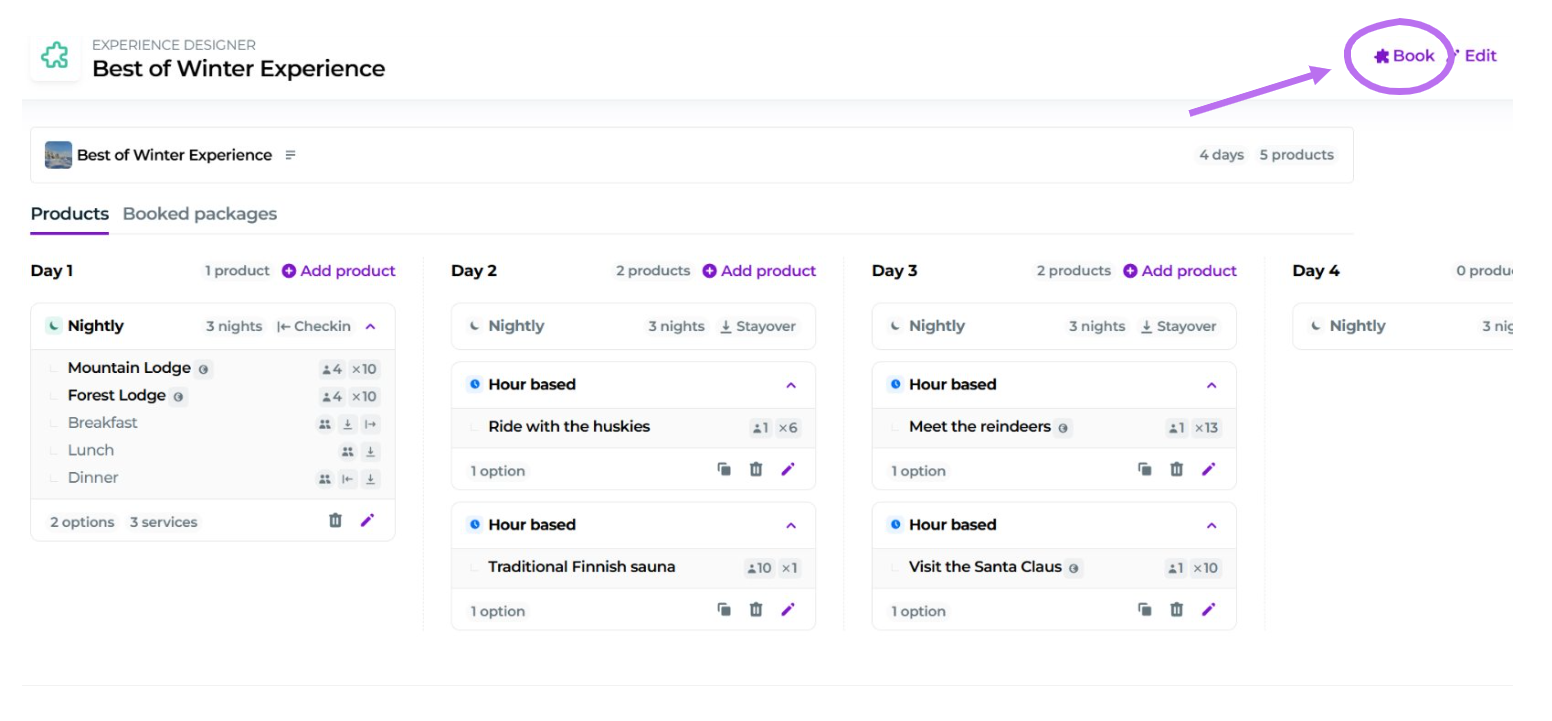
In Moder, go to Products → Experience Designer. Click the name of the package you want to book, then click the "Book" button in the top-right corner.
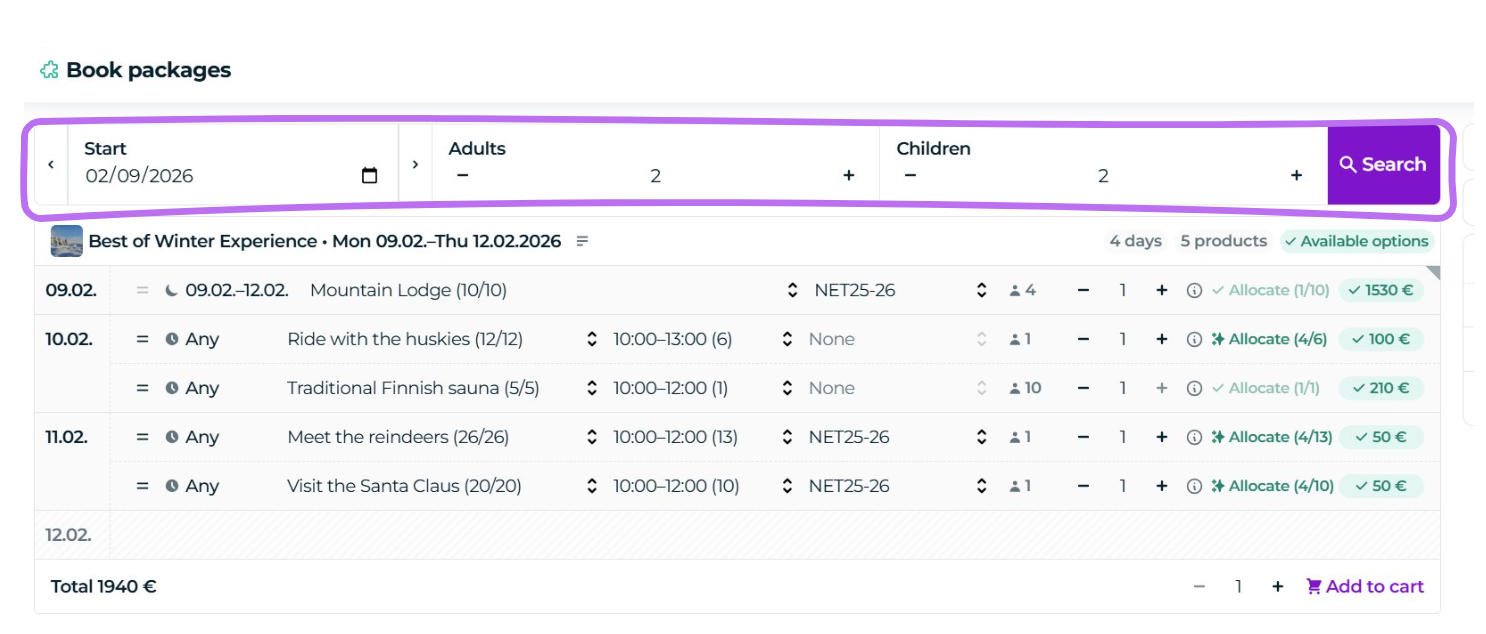
First, select the package booking start date and the number of people from the top bar. Then click "Search".
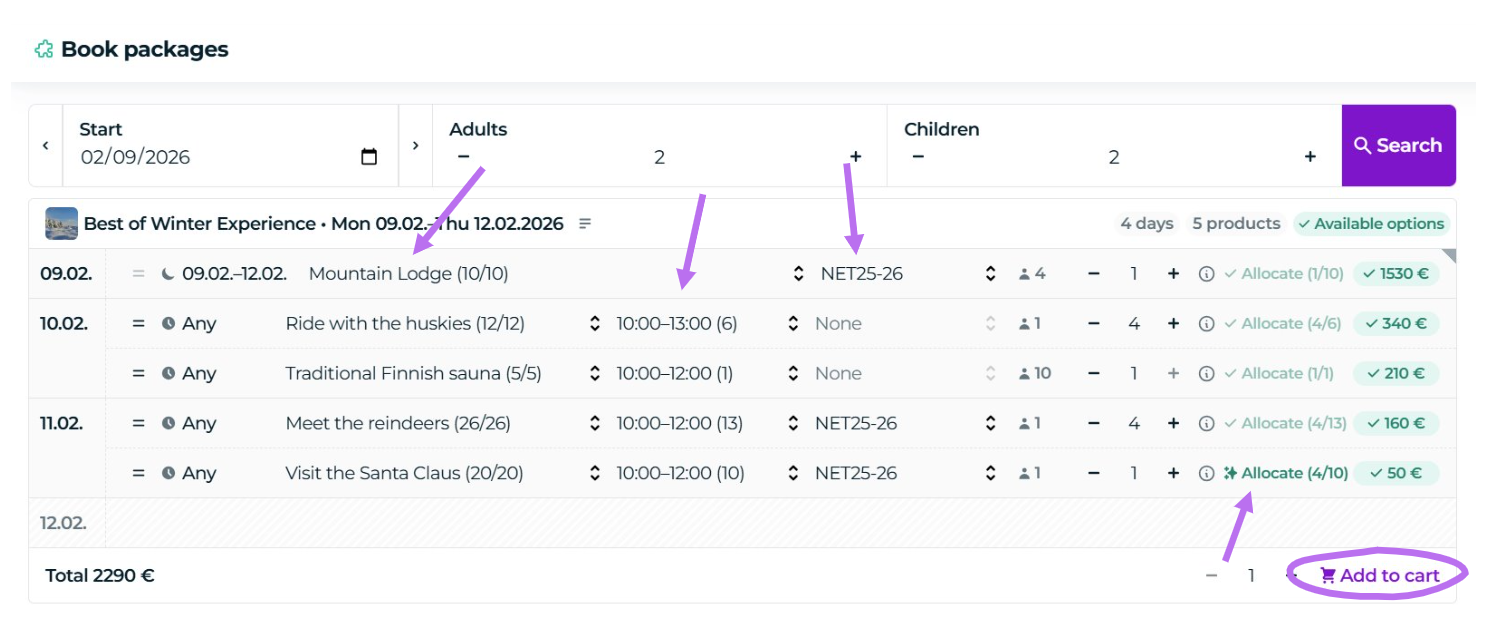
After that, make the required selections in the booking window:
Select which product option is used for the booking if multiple options are available (for example, in this case there are two accommodation options included in the package).
Select the desired time slot for the activities.
If you want to move activity products from one day to another, you can do this by dragging the activity using the = icon.
Make sure the price group is correct for each product and change it if needed (in the example below, the price group NET24-25 is used for other products except for the sauna experience and the husky safari).
Allocate the required number of units to each product.
Moder will show you how many units need to be allocated.
This is especially important for unit-based activity products.
Finally, click "Add to cart".
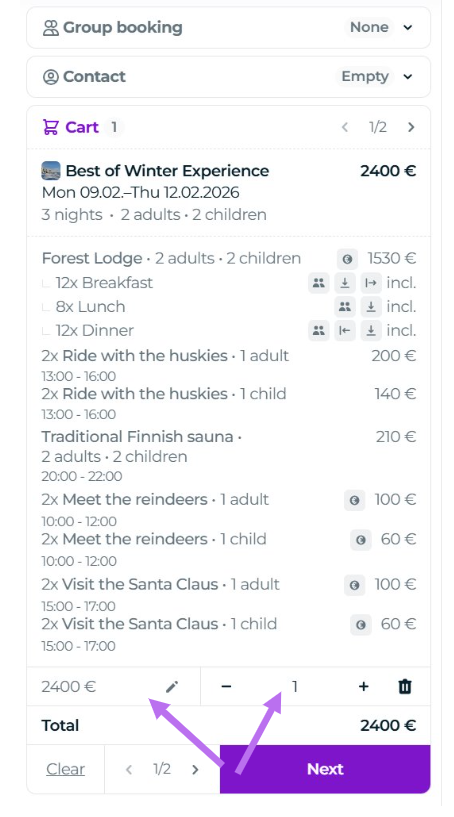
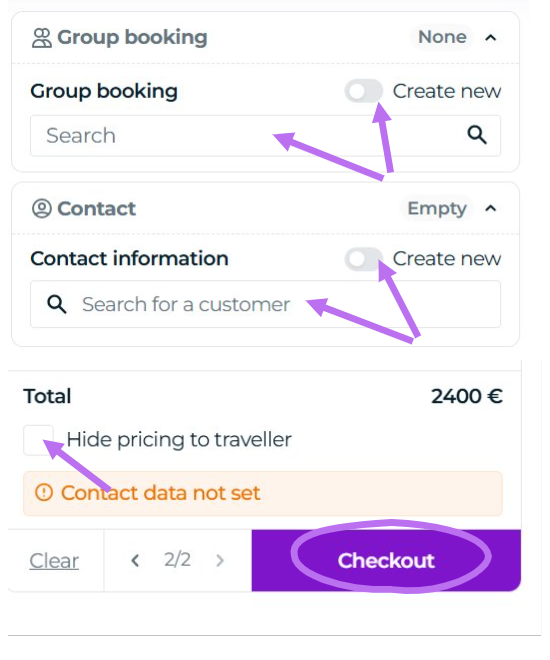
After adding the package booking to the cart, you can still define the following options at the bottom of the cart if needed:
You can edit the number of packages being booked, meaning you can book multiple packages at once using the same search criteria.
You can also set a customised price for the package by clicking the pencil icon in the price column, if needed.
If you modify the total package price, the prices of all accommodation and activity products included in the package booking will be adjusted proportionally.
The price of extra services will always remain unchanged, even if the package price is modified in the cart.
Finally, enter the guest’s name and contact details for the package booking.
You can either search for a returning customer profile using Search customer, or create a completely new customer profile by activating the Create new toggle.
You can also, if needed, create a group booking directly from the package bookings (Group booking → Create new) or link the package bookings to an existing group booking (Search group booking).
If you want to hide pricing details from the guest’s booking confirmation, tick Hide pricing from traveller.
Finally, click Checkout to successfully create your first package booking!
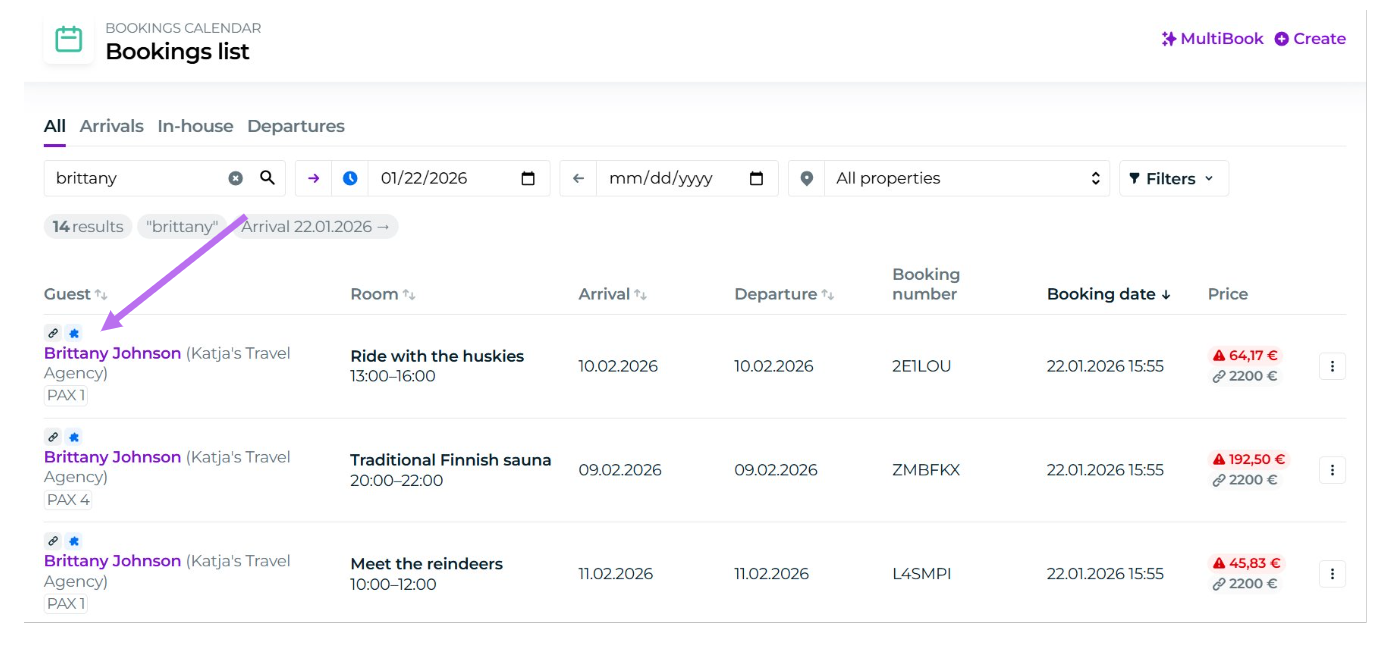
Package bookings in the booking list and bookings calendar
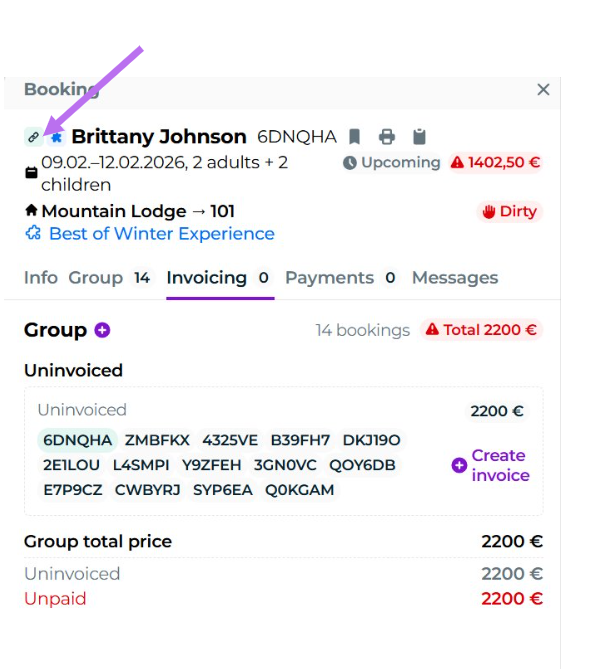
In the booking list and bookings calendar, package bookings can be identified by the blue icon shown in the image below.
The bookings are linked together in the same way as bookings created with MultiBook.
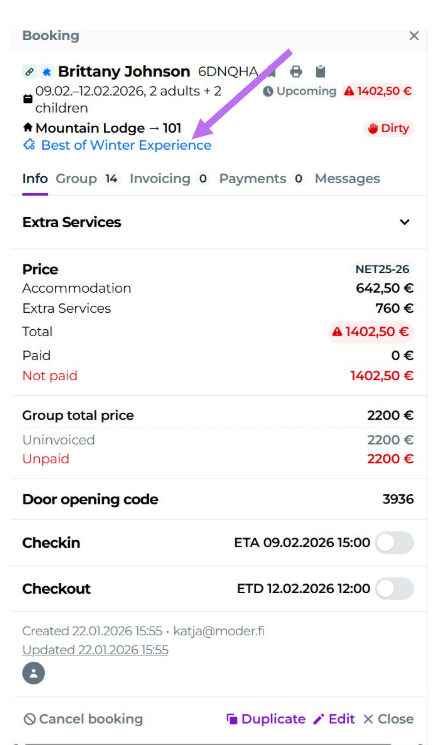
In the booking preview, you can also see the name of the package that has been booked for the guest.
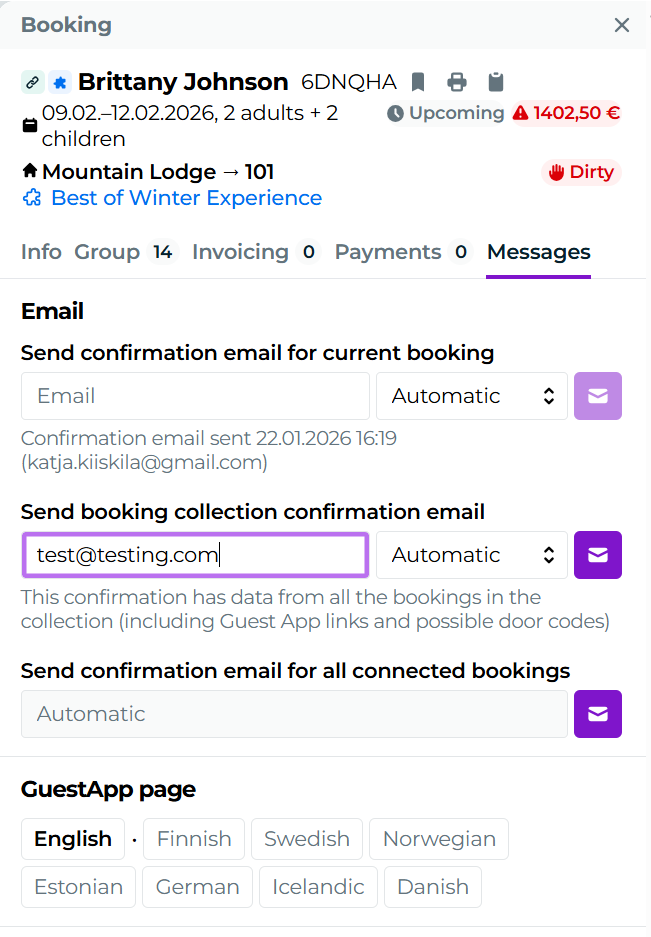
Sending a booking confirmation from a package booking
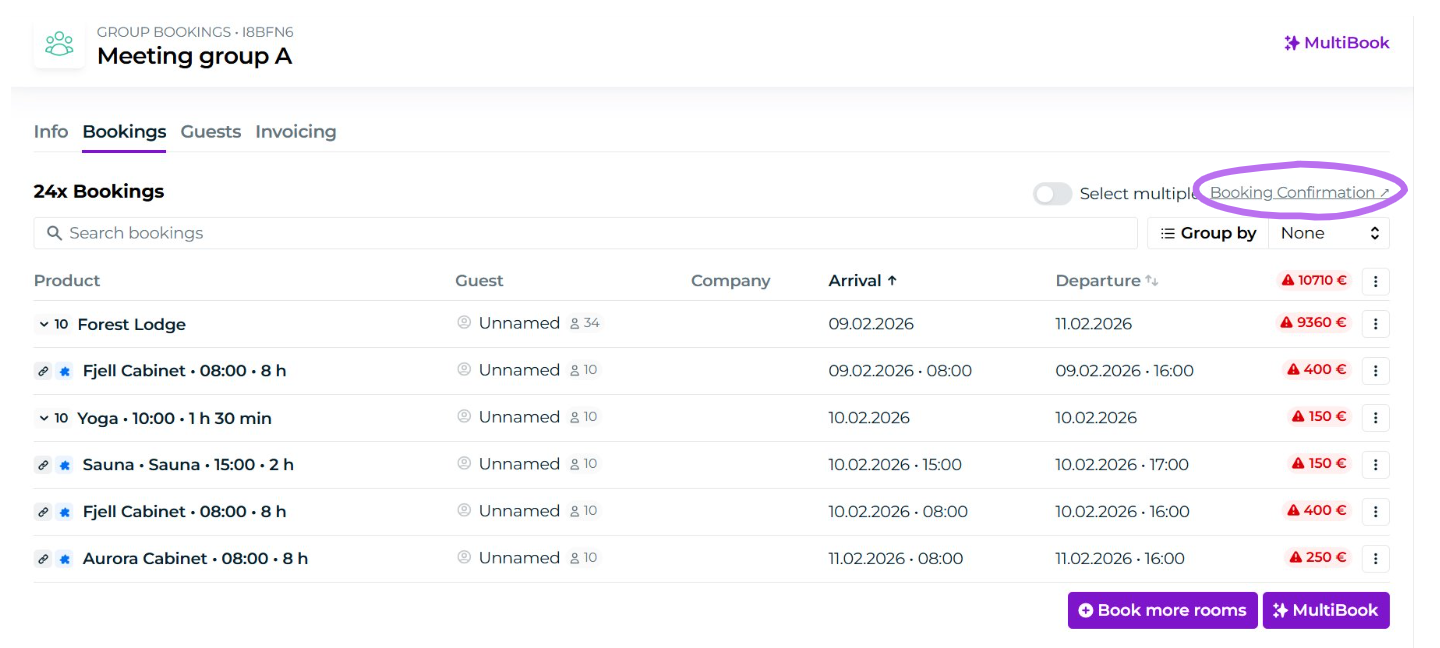
Booking confirmations for reservations created with Experience Designer are sent in the same way as for bookings made via MultiBook.
Open any package booking (accommodation or activity booking), go to the Messages tab, add the recipient’s email address in the field “Send booking collection confirmation email” and click the envelope icon.
If you have created the package bookings into a group booking, you can also use the group booking's booking confirmation.
Creating and sending an invoice from a package booking
For bookings created with Experience Designer, invoices are created in the same way as for combined bookings made with MultiBook: open the main booking of the package (the booking with the link icon on a light green background, usually the accommodation booking), go to the "Invoicing" tab, and click "Create invoice".
You can read more about creating and sending invoices and payment links from this support article:
📄 Laskut & maksut: maksulinkki ja PDF-lasku
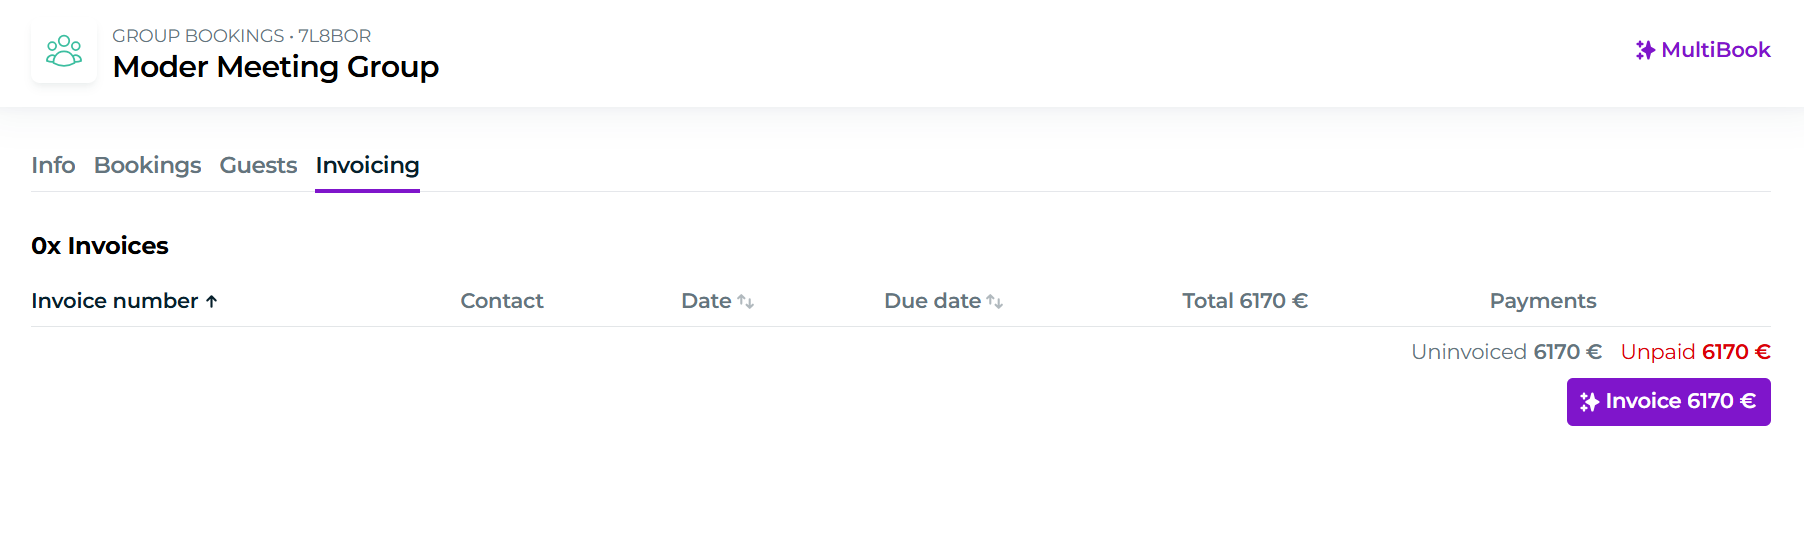
If you have created a group booking of the package bookings, you can create the group invoice normally from the group booking's "Invoicing"-tab.
How do bookings created with Experience Designer appear in reports?
Bookings created with Experience Designer appear in reports, such as the Sales Report and the Financial Summary Report, in the same way as other bookings under the products to which the bookings were created.
At the moment, bookings made via the package tool are not listed or categorized separately in reports.
Experience Designer and the webshop
Experience Designer is currently available for back-end bookings, and publishing packages to the webshop will become available with the launch of the new webshop. The target timeline for this is H1/2026.